Given its volatility, crypto markets can be a rollercoaster ride, especially so for those new to the game. For those looking to navigate crypto markets, automated tools such as trading bots are the perfect mechanism in generating high returns without needing to be a trading or coding expert.
In particular, a good entry point for all crypto traders are grid trading bots. Designed with advanced and amateur traders in mind, BitMEX’s Trading Bots are all about helping you kick back and relax while growing your passive income.
You can learn more about grid trading and how it works in this article.
What are Grid Trading Bots?
The beauty of grid trading lies in its simple rule-based structure, making it an ideal candidate for automation through trading bots. With a set of predefined order rules and triggers, all traders need to do is insert their desired strategy in motion, and let the bot handle the rest.
This hands-off approach to trading eliminates the need for constant monitoring and decision-making, allowing traders to focus on other aspects of their portfolio.
How to Use BitMEX Trading Bots
There are two categories of Trading Bots on BitMEX: Basic and Advanced. For those just getting started with automated trading, we recommend using the Basic Bots feature which can help you execute with a few clicks.
The Advanced Bots feature is designed for those more familiar with bot trading, and offers a more extensive scope of criterias for each bot – users can choose their desired grid spread and counts, the indicator that a bot places trades on (e.g. RSI), and much more.
Basic Bots on BitMEX
Before getting started, select the contract you wish to start trading (e.g. BTCUSD or ETHUSD).
On the left side of your trading UI, you’ll find your Order form. At the top of the Order form, click on the Bots tab, as shown below.
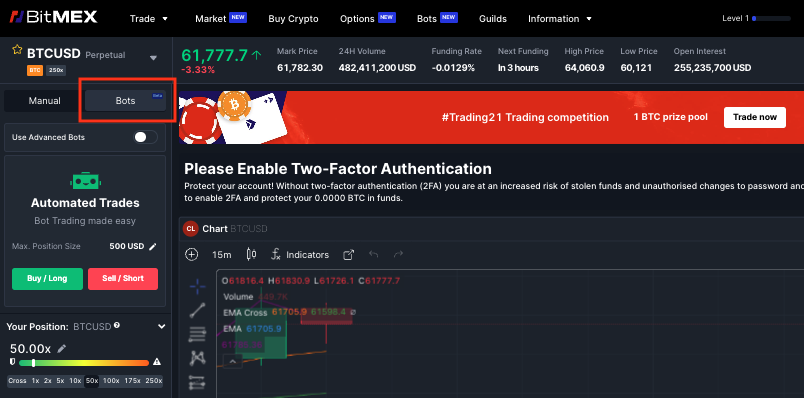
Once you’re there, you’ll be greeted with a green bot labelled Automated Trades, as shown above. Here, you will be able to adjust two things:
- Market View: Whether you wish to Buy/Long vs. Sell/Short the contract
- Max. Position Size: The price increments at which your trades are placed at*
*Note: You can input your max. position size in Notional (underlying currency) terms or Total Value terms (USD). You can find more details on minimum position sizes for each contract on BitMEX on the detailed contracts guide page.
After setting the criterias to levels you’re comfortable with, click on either the Buy/Long or Sell/Short button (depending on your market view) to get started.
Your Bot will start running immediately after you hit start. Once it begins, the Bot will automatically place trades aligned with your market view (e.g. Buy/Long will place Take Profit orders) while also placing defensive orders (Stop Loss orders) at the same time.
How to Change or Stop Your Trading Bot
You are able to amend your bot or stop it from running any any time.
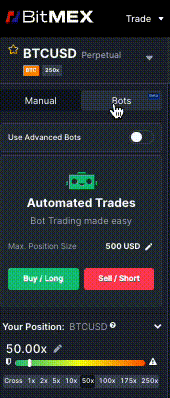
Let’s say you believe Bitcoin will go up in the next week. With this view, you decide to start a Buy/Long Bot for BTCUSD. Once your bot starts running, your Order form will display the following, as shown below.
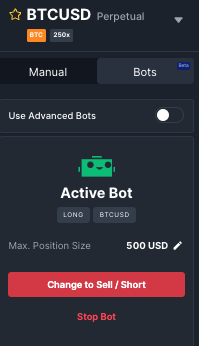
If, after time, you feel that the market is turning against you (in other words, moving in the opposite direction of your initial long view), you can click the ‘Change to Sell/Short’ button, as shown above.
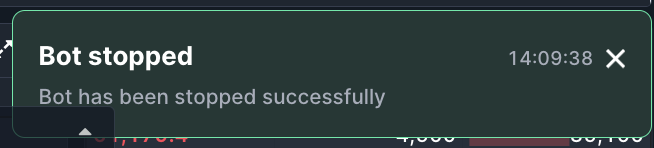
To stop your Bot from running, click on ‘Stop Bot’. If successful, a pop-up notification should appear on the bottom right corner of your screen, with the below.
Advanced Bots on BitMEX
Users looking for more configuration options for their trading bots can use our Advanced Bot feature.
You can access Advanced Bots via two ways, as outlined below.
Method 1: Bots Order form
Under the Bots tab, turn on the slider next to ‘Use Advanced Bots’. \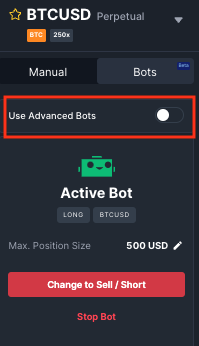
This will display Bots with more configuration options for the contract you have chosen to trade.

You’ll find the list of Bots available for the selected contract under the ‘Search’ tab. Each bot will show a Configure button and a blue play button.
The configure button allows you to customise the Bot based on your strategy. Once you’ve set up the Bot’s configuration, you can click on the blue play button to start running your Bot.
Method 2: Bots Marketplace
Click on the ‘Bots’ tab located on the navigation bar of the BitMEX trading UI. This will take you to the BitMEX Bots Marketplace which hosts all the trading bots available on our platform.

1. Understand the different types of bots available
You will find six tags for every bot:
- Author: The creator of the bot
- Directional strategy: Whether the bot is long, short, or neutral
- Time intervals: The intervals (based on candle size used to calculate RSI) at which the trades are placed (1m vs. 15m vs. 1hr)
- Technical Analysis (TA): Specific technical indicators or strategies used by the bot (e.g., Bollinger Bands, RSI, or Grid)
- Contract: The contract that the bot trades (e.g. BTCUSD)
On the Bots Marketplace, you will find a list of Grid bots available on BitMEX. They are divided into several categories:
- Oversold Scalper: These are long grid bots that only place buy orders (bids) and require a Take Profit (TP) level to close the position.
- Overbought Scalper: These are short grid bots that only place sell orders (asks) and require a Take Profit (TP) level to close the position.
- Mean Reversion Scalper: These are neutral grid bots that place both buy and sell orders, aiming to profit from price fluctuations in both market directions.
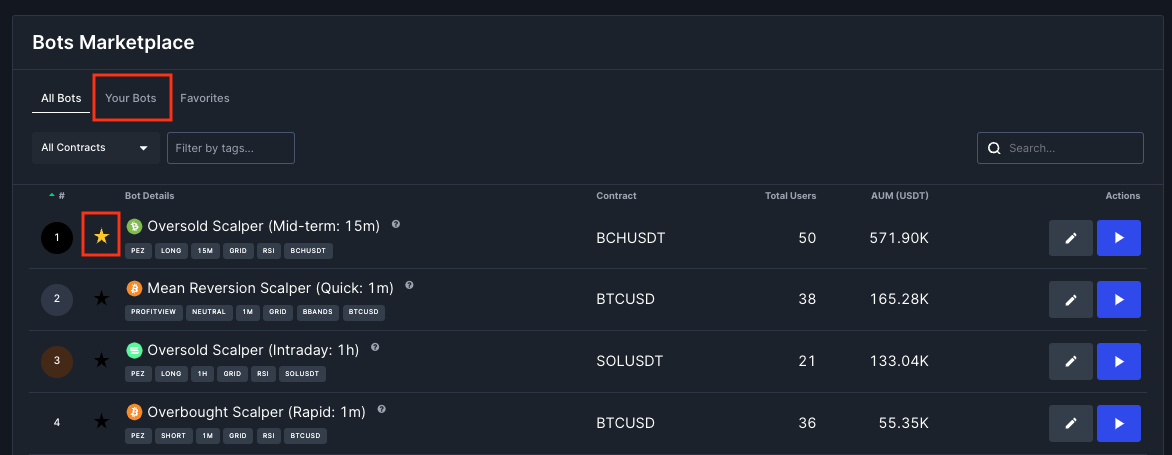
2. Keep track of your trading bots
Any bot you start to run, or have run in the past will show under the ‘Your Bots’ tab in your trading interface. You can also save your favourite trading bots by clicking on the star icon on the left side of the specific bot, as shown below.
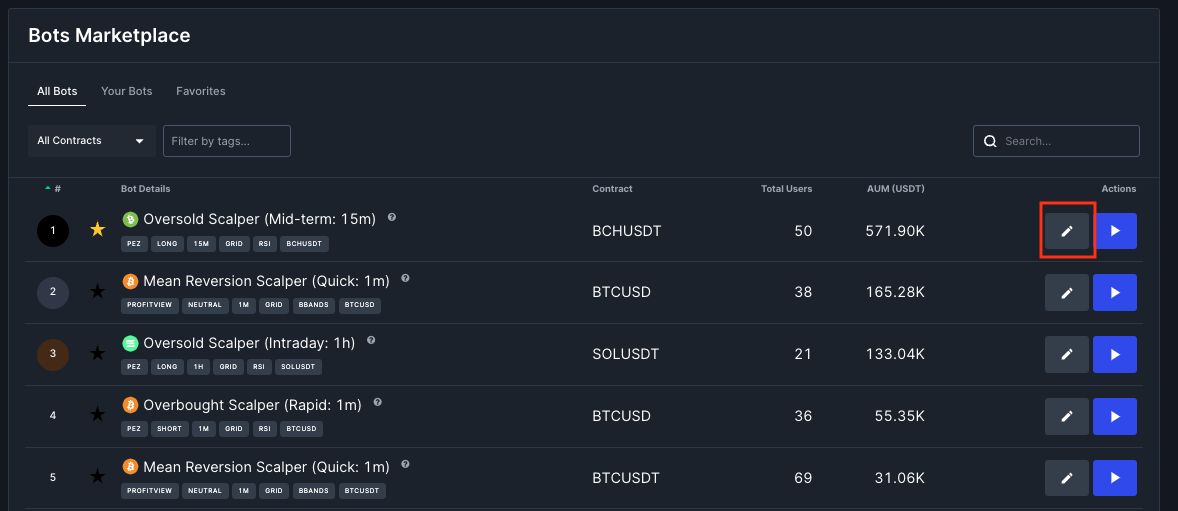
3. Configure any trading bots to your liking
Once you select a trading bot that you’d like to start using, you can click on the edit icon on the right side of each bot to configure them with your specific parameters.
Once you click on the icon, you will be led to your Bots Order form, where you will be able to specify the following parameters:
- Grid Count: The total amount of limit orders you wish to place on either side of the reference price (bid or ask).
- Grid Spread: The distance between each limit order in terms of basis points (one basis point is equal to 0.01%).
- Initial Position Size: The initial position size that the bot should take when starting to run, as a percentage of the maximum order size.
- Max. Order Size (optional): The maximum order size that can be placed at a particular price. You can choose to enable configuration for this parameter.
- Price Max Buy: The maximum long or short position size the bot can take for a particular contract. Can be configured in terms of number of contracts, in notional terms (in terms of underlying currency), or in USD terms.
- Stop Loss % (optional): The stop loss set as a percentage distance away from the average entry price.
- Take Profit % (optional): The take profit set as a percentage distance away from the average entry price.
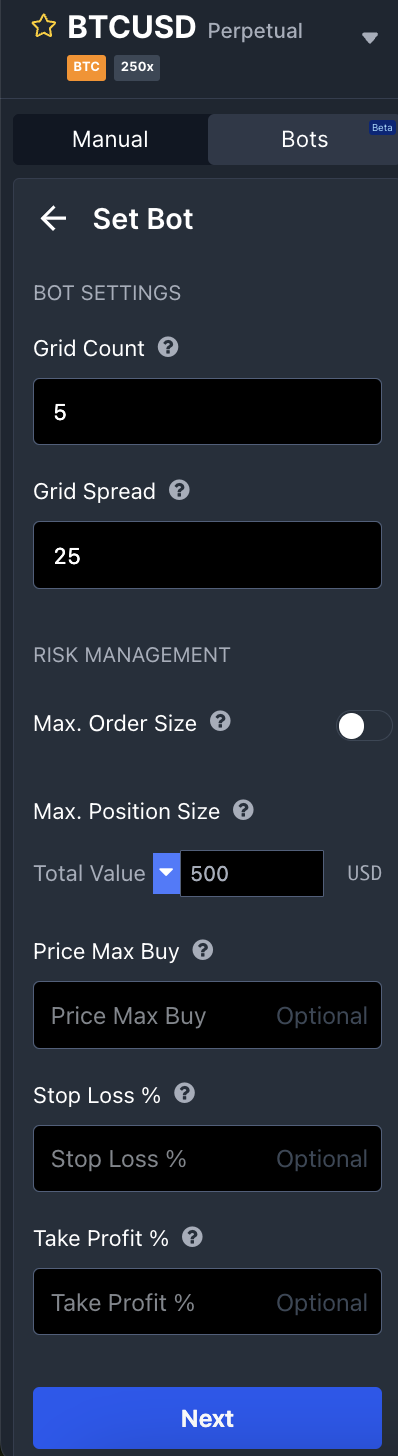
There will be default parameters set for every trading bot. You can choose to configure some or all of the trading parameters depending on your strategy.
Once you’re comfortable with the parameters you’ve set, hit the ‘Next’ button. This will lead you to a summary of your trading bot’s parameters. You can then click ‘Start bot’, which will start executing orders in real-time.

The Bottom Line
BitMEX Trading Bots are an invaluable tool for crypto traders of all kinds who wish to reap the benefits of automated trading and 24/7 market accessibility. With simple execution and an intuitive trading interface, BitMEX Trading Bots are for those who wish to maximise their profit opportunities regardless of whatever market condition.