Overview
Following the recent publication of a new proposed Proof of Reserves-based system which preserves user privacy, we are now ready to provide a working example. The BitMEX platform is used as an example, based on a one-off snapshot for demonstration purposes at Bitcoin block height 693,062. This block was produced on 28 July 2021. This piece includes a step-by-step guide, such that anyone can verify BitMEX’s reserves at this snapshot point and also verify liabilities are included in the liability snapshot, using provided example account details.
Downloading the reserve and liability data files
As at 29 July 2021, BitMEX has published details of its Bitcoin reserves and liabilities at the snapshot point, as a one-off demonstration exercise. The reserve file is a full list of all the Bitcoin under the control of the company and willingness to publish this list demonstrates a high degree of openness and transparency. Going forwards, the plan is to eventually publish these details each month.
The full reserve and liability files can be downloaded here:
https://public.bitmex.com/?prefix=data/porl/
Proof of Reserves
A screenshot of the BitMEX reserves file is provided below. At the top of the text file, one can see the snapshot point (Block 693,062). The total Bitcoin reserve balance is also included, 11,009,053,026,106 Satoshis or 110,090 Bitcoin. (BitMEX always calculates everything in Satoshis, due to the precision required in the trading platform). Given BitMEX’s vanity addresses, external analysts have always had a good idea of BitMEX’s Bitcoin reserves, however this is the first time this has been published to this level of detail.
BitMEX has always been an extremely transparent company and stores all the Bitcoin under one multisignature scheme, with three static public keys. These three keys are also provided at the top of the file. The 200MB file then contains a long list of addresses and execution scripts for each UTXO under custody; these execution scripts include the three BitMEX public keys. This therefore proves that the company is able to access all the funds, assuming the company has access to the three private keys associated with the three public keys, however this is proven each day when the company conducts withdrawals. Therefore this file can be considered as a proof of company reserves and proof that the funds are spendable.
Screenshot of the BitMEX Reserves File
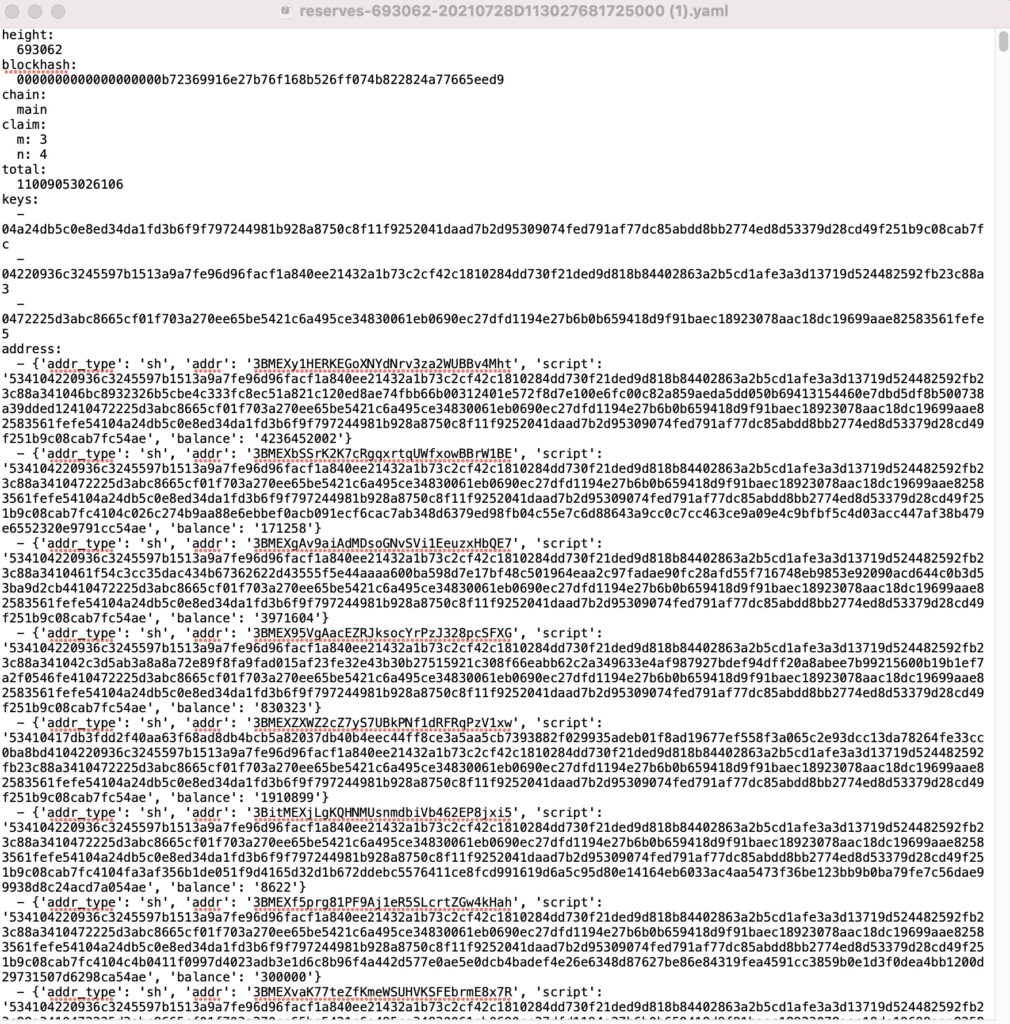
Source: BitMEX
The database consists of around 300,000 UTXOs. One can also use this dataset to see BitMEX’s progress with regards to the transition to native SegWit format addresses, with the most recent addresses all using the new bech32 format. In addition to the above, BitMEX has also published a tool to verify this list of reserves against a copy of the Bitcoin blockchain obtained when running Bitcoin Core. More details on how to conduct this exercise will be provided later in this report.
Proof of Liabilities
Below we have provided a step by step guide which explains how to verify that your liabilities are included in the published Merkle tree of liabilities. Currently BitMEX has not provided the necessary account details to its clients for them to conduct the process, however the BitMEX insurance fund account details are provided. When conducting this exercise you can see which leaves the account balance is located in and check that it is included in the grand total.
Proof of Liabilities – Step by step guide using an example account
Step | Name | Details |
1 | Download the liabilities file | The full link to the 142 MB liabilities file is available here: |
| 2 | Download the project code | The tools to verify the reserves and liabilities are open source and can be downloaded here: |
3 | Open the Terminal | If you are using a Mac or Linux, you open your Terminal application to run the necessary commands. |
4 | Go to the directory | You need to go to the directory where you downloaded the software package from GitHub. In our case we typed the following command: CD ~/Downloads/proof-of-reserves-liabilities |
|
5 |
Check system requirements |
In order to check the system has the correct applications installed, run the following command: |
|
6 |
Execute the proof of liabilities |
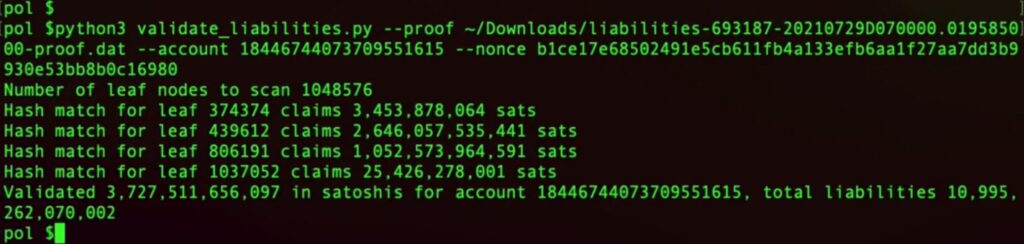
The final step is to run the command which searches the liability file for the account balances and prints the outputs. In order to correctly do this you must reference where you downloaded the liability file and provide your account details. In the below command, an example account details are used. |
In the above exercise, the account number 18446744073709551615 belongs to the BitMEX insurance fund account. If the system goes live, clients may each be provided with their own account IDs. As the table below illustrates, the insurance fund has been split into four leaves in this snapshot. The total balance in all of the four leaves sums up to 37,275 Bitcoin. This is the output you should see if you conduct the exercise above.
Insurance Fund Proof of Inclusion in Liabilities
Sats | Bitcoin | |
Leaf 374,374 | 3,453,878,064 | 35 |
Leaf 439,612 | 2,646,057,535,441 | 26,461 |
Leaf 806,191 | 1,052,573,964,591 | 10,526 |
Leaf 1,037,052 | 25,426,278,001 | 254 |
| Total | 3,727,511,656,097 | 37,275 |
Source: BitMEX
The below video is also a working demonstration of the Proof of Liabilities exercise. One can witness the computer search through the Merkle tree of liabilities and find the four relevant leaves, proving the balance is included in the grand total.
Working Demonstration of Proof of Liabilities – Video
Reconciliation of the Proof of Reserves to the blockchain
As mentioned above, in a way proving the reserves is easy because all you need to do is download the reserves file and inspect it. However, BitMEX also provides a tool to reconcile all those UTXOs with the blockchain, which you can obtain by running Bitcoin Core. A step by step guide, explaining how to conduct this process, is outlined below.
Proof of Reserves Reconciliation To The Main Chain – Step by step guide
| Step | Name | Details |
| 1 |
Download the reserves file |
The full link to the 200 MB liabilities file is available here: |
| 2 |
Download and install Bitcoin Core |
The software is available here: |
|
3 |
Create an RPC account |
You need to edit the Bitcoin Core configuration file to enable your computer to have RPC access. We set our bitcoin.conf file up as follows: |
|
4 |
Sync Bitcoin Core to the chain tip |
You then need to sync Bitcoin Core to the current chain tip, this could take around 10 hours. (However, many of the people attempting this exercise are likely to already be very familiar with this process) |
| 5 |
Go to the directory |
You need to go to the directory where you downloaded the software package from GitHub. In our case we typed the following command: |
|
6 |
Execute the proof of reserves command |
The final step is to run the command which connects to Bitcoin Core and conducts the exercise . In order to correctly do this you must reference where you downloaded the reserves file and provide your RPC account details to access Bitcoin Core. Please see the command we used below: |
| 7 |
Bring Bitcoin Core back to the tip |
After conducting the proof, we had to run the following command to allow Bitcoin Core to reconnect back to the chain tip. |
Screenshot of Proof of Reserves Process
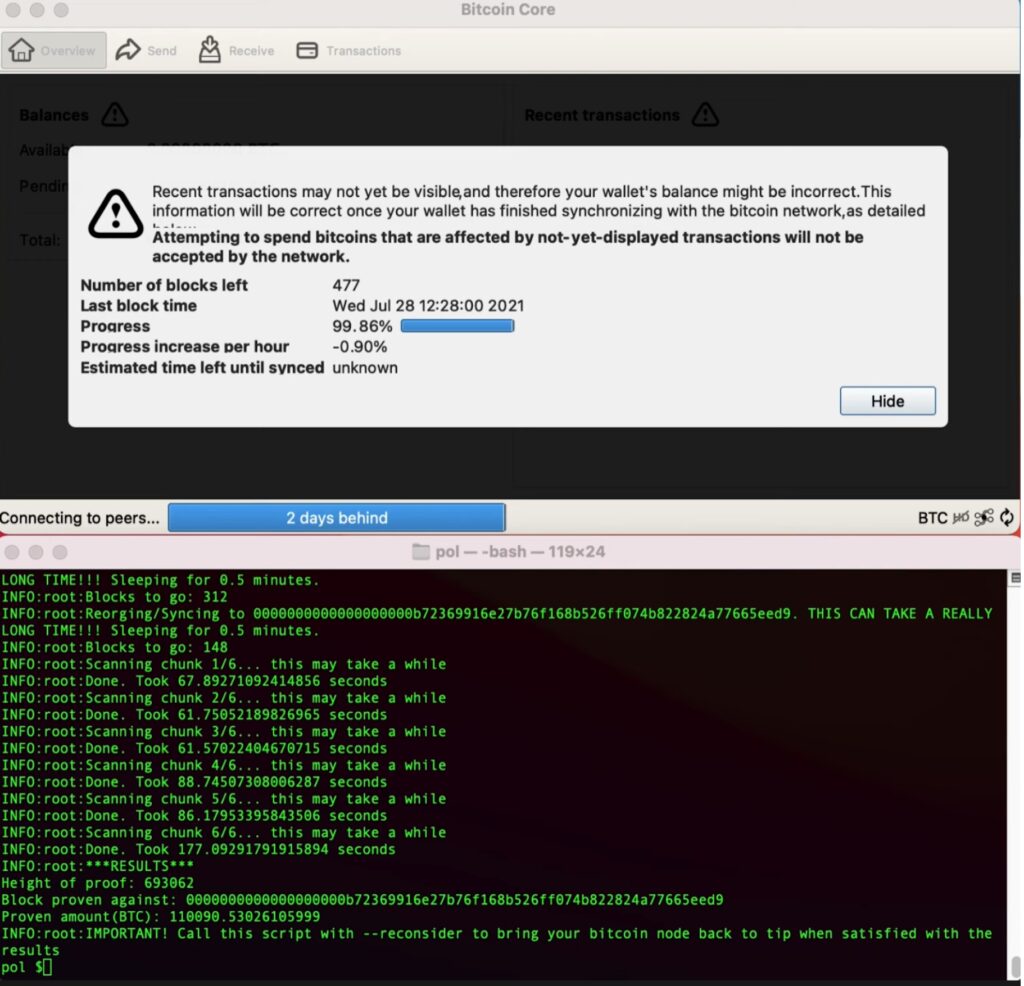
The entire process took around 20 minutes, the most challenging part of the process involves rolling back Bitcoin Core to the snapshot block height, to conduct the check. This is why the image above shows Bitcoin Core in a state of being rolled back two days. As the image above also illustrates, we were able to verify that BitMEX controls 110,090 Bitcoin as at block height 693,062.
Working Demonstration of Proof of Reserves – Video
And there you have it, BitMEX claims to control over 100,000 Bitcoin and now you can completely verify this yourself, checking the balance against the blockchain using open source software.